Oblivion:Fort Rayles
|
|||
|---|---|---|---|
| # of Zones | 2 | ||
| Occupants | |||
| Conjurers, Daedra (2 boss-level Conjurers) |
|||
| Important Treasure | |||
| 2 boss-level Chests 1 War Axe of Jolts |
|||
| Console Location Code(s) | |||
| FortRayles, FortRayles02 | |||
| Region | |||
| Colovian Highlands | |||
| Location | |||
| Northwest of Chorrol, near the Hammerfell border | |||
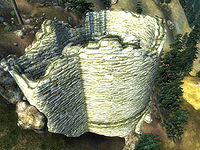
Fort Rayles is a medium-sized fort northwest of Chorrol containing conjurers. It contains two zones: Fort Rayles and Fort Rayles Hall of Winter.
Notes[edit]
Exterior[edit]
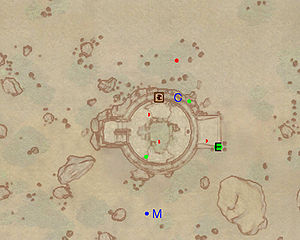
- The exterior is located at coordinates: Tamriel -22, 28
- This location's map marker (M on map) is named Fort Rayles (editor name FortRaylesMapMarker). The entrance door is N of the marker, 130 feet away. It is located inside the fort, on the upper level of the tower.
- 0-3 Conjurer Enemies (each 50% probability Conjurer, 50% Daedra) are near the entrance
- 1 Wilderness Creature (Mountains variety) is near the entrance
- 1 Chest 02 is near the entrance
- 1 Wilderness Chest (non-respawning) is near the entrance
- The other following items can be found near the entrance: 1 Note of Bounty (on the roof, at E on the map), 1 Poison of Paralysis, 1 Cure Paralysis scroll, and 1 Summon Skeleton scroll
- The following plants can be found near the entrance: 13 Clouded Funnel Cap plants
Zone 1: Fort Rayles[edit]
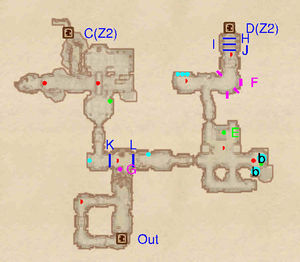
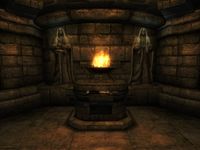
Upon entering, you will face up to two enemies before arriving at the barred gates at K and L. In front of you are two stone statues with blue gems on their foreheads, as well as two very convenient silver arrows. Hit the gems and both gates will open up for you. Note that you do not require a bow here; you can just drop a single arrow, grab it, and touch the statue's face with it. Head through the eastern gate; in the next room are up to two enemies, four bedrolls arranged on two bunk beds (b), a minor loot chest and a collection of alchemical equipment and books (E).
In the next room you will face up to two enemies - try to use the arrow traps at F to your advantage. Three levers are on your left before the traps, each controlling one of the gates at H, I and J. Pull the rightmost lever to open the middle gate and proceed to the next zone from door D.
When coming back to this zone from the Hall of Winter, you will emerge from a wall dug into the wall of the fort. Defeat the enemy nearby and claim the repair hammer lying in the rubble. Climb to the upper level, defeat another enemy and loot the minor loot chest nearby before heading for the exit.
Occupants:
Treasure:
- 1 Chest 01
- 1 Chest 02
- The following alchemy equipment will always be found: 1 Novice Alembic, 2 Novice Calcinators, and 2 Novice Mortar & Pestles
- The other following items will always be found: 1 Repair Hammer and 2 Silver Arrows
- Some of the above items are clustered at location E: 1 Novice Alembic, 1 Novice Calcinator, and 2 Novice Mortar & Pestles
Traps:
Doors and Gates:
- There are three doors in/out of this zone
- 1 door (at Out) leads outside
- 2 doors (at D and C) both lead to the zone Fort Rayles Hall of Winter
- 5 Portcullis Gates at H, I, J, K, and L
Other:
- 4 bedrolls at locations b on map
Zone 2: Fort Rayles Hall of Winter[edit]
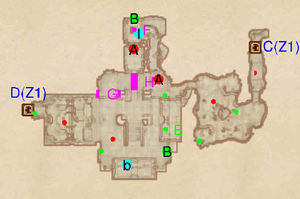
If you entered from door D, loot the chest nearby and fight with the enemy guarding it. The commotion will probably attract at least one other enemy from the large room ahead. This area contains two boss-level Conjurers (A), one on the bottom floor and one pacing near the bridge above you.
Once you've defeated them, head to the eastern side, avoiding the arrow trap at G. On a stone altar (E) you will find a full set of novice alchemical equipment, while on the one next to it lie a novice calcinator, a portion of bonemeal, a carved up zombie corpse and the offending steel dagger. There are also two minor loot chests, a bedroll (b) and a boss chest (B) nearby.
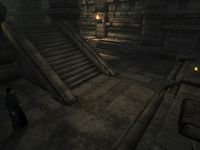
Head up the stairs and pause just before the bridge. On the ledge to your right are a couple of bones and a War Axe of Jolts. You'll need to jump and make a grab for it. Once you've got it, head back up the stairs and across the bridge (H), taking care as it will collapse under you. Step around the broken grate at F and loot the boss chest at B. Nearby are an Apprentice Retort, a potion of feather, a copy of The Book of Daedra, a mages's robe and the rare matching hood.
Jump down the grate, which will cause some damage, and you will come across a dead goblin (I) surrounded by bottles of beer. Leave your unresponsive drinking buddy and head into the caverns beyond. The next room contains up to two enemies and two minor loot chests. Return to the first zone from door C.
Occupants:
- 2 boss-level Conjurers at locations A on map
- 2 Conjurer Enemies (each 50% probability Conjurer, 50% Daedra)
- 0-1 Daedra
- 1 Daedra (always best possible level)
Treasure:
- 2 boss-level Chests (Conjurer variety) at locations B on map
- 1 War Axe of Jolts
- 1 Chest 01
- 1 Chest 02
- 2 Chests 04
- The following alchemy equipment will always be found: 1 Apprentice Retort, 1 Novice Alembic, 2 Novice Calcinators, 1 Novice Mortar & Pestle, and 1 Novice Retort
- The other following items will always be found: 1 Bonemeal, 1 Potion of Feather, 1 Mage's Robe, 1 Mage's Hood, and 1 Steel Dagger
- Some of the above items are clustered at location E: 1 Novice Alembic, 1 Novice Calcinator, 1 Novice Mortar & Pestle, and 1 Novice Retort
Traps:
- 1 Broken Grate trap at location F on map
- 1 Crumbling Bridge trap at H
- 2 Darts traps at G
Doors and Gates:
- There are two doors (at D and C) in/out of this zone, both leading to the zone Fort Rayles
Other:
- 1 Dead Goblin (may carry a lockpick) at location I on map
- 1 bedroll at b
